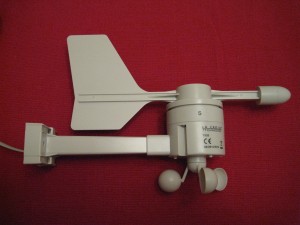
After a LOT of investigation of the La Crosse TX20, I’ve managed to fully decode the complete datagram from the La Crosse TX20 INCLUDING the Checksum.

Here’s everything you’ll ever want to know about the pin out and the communications protocol of the La Crosse TX20.
Wiring Pinout:
| Pin | Color | Description |
|---|---|---|
| 1 | Brown | TxD |
| 2 | Red | Vcc |
| 3 | Green | DTR |
| 4 | Yellow | GND |
I’ve been running my unit on 5volts DC without a problem. The TX20 will transmit data every two seconds when DTR (Pin 3, Green) is pulled low.
If you connect the GND and TxD to a oscilloscope, you’ll see a waveform similar to the following.

The datagram is 41 bits long and contains six data sections. Each bit is almost exactly 1.2msec, so the datagram takes 49.2 msec to transmit nd uses Inverted logic (0v = 1, +Vcc = 0).
| Section | Length (bits) | Inverted? | Endianness | Description | Notes |
|---|---|---|---|---|---|
| A | 5 | Yes | LSB first | Start Frame | Always 00100 |
| B | 4 | Yes | LSB first | Wind Direction | 0-15, see table below |
| C | 12 | Yes | LSB first | Wind Speed | 0-511 |
| D | 4 | Yes | LSB first | Checksum | See below |
| E | 4 | No | LSB first | Wind Direction | 0-15, see table below |
| F | 12 | No | LSB first | Wind Speed | 0-511 |
A – Start Frame and Triggering / Detecting start of data
If you hold the DTR line low permanently, the TxD line will be held low unless the unit is transmitting data.
The start frame is always 00100, but due to being inverted logic (making it detected as 11011), you can use a rising edge trigger / interrupt to detect the start of the datagram.
B – Wind Direction
The wind direction is supplied as a 4 bit value. It requires inverting and needs it’s endianness swapped. Once this is done it’s a value of 16th’s of a revolution from North. Thus it can be multiplied by 22.5 to get a direction in Degrees, or a 16 value array can be used to return the direction.
In the example image above, the Wind direction is read as 0011, Inverted to 1100 and then it’s endianness is swapped to 0011, which is ENE, or 67.5 degrees.
Table of the directions is below.
| Binary | Hex | Decimal | Direction |
|---|---|---|---|
| 0000 | 0 | 0 | N |
| 0001 | 1 | 1 | NNE |
| 0010 | 2 | 2 | NE |
| 0011 | 3 | 3 | ENE |
| 0100 | 4 | 4 | E |
| 0101 | 5 | 5 | ESE |
| 0110 | 6 | 6 | SE |
| 0111 | 7 | 7 | SSE |
| 1000 | 8 | 8 | S |
| 1001 | 9 | 9 | SSW |
| 1010 | A | 10 | SW |
| 1011 | B | 11 | WSW |
| 1100 | C | 12 | W |
| 1101 | D | 13 | WNW |
| 1110 | E | 14 | NW |
| 1111 | F | 15 | NNW |
C – Wind Speed
The wind speed is a 12 bit value. It requires inverting and needs it’s endianness swapped.
Once this is done it’s a value in units of 0.1 metre/sec. The 3 MSB’s are always 000, so only 9 bits are used. With a max value of 511, this relates to 51.1 metres per second, or 183.96 km/h (114.31 miles per hour).
From the example image above, the wind speed is read as 111010101111, Inverted to 000101010000, then endianness swapped to 000010101000, which is 168, or 16.8 metres per second.
D – Checksum
The checksum is a 4 bit value. it requires inverting and needs it’s endianness swapped.
This is a 4 bit value of the four least significant bits of the SUM of the wind direction and the three nibbles of the 12 bit windspeed.
The checksum in the datagram above is read as 0101, Inverted to 1010, then endianness swapped to 0101.
For the datagram image above, the checksum would be calculated by:
| Name | Bits | Example |
|---|---|---|
| Wind Direction | 1 – 4 | 0011 |
| Wind Speed | 1 – 4 | 0000 |
| Wind Speed | 5 – 8 | 1010 |
| Wind Speed | 9 – 12 | 1000 |
| SUM | 4 LSBs | 0101 |
As the Checksum received matches the calculated Checksum, the received data is likely to be correct.
E – Wind Direction (Inverted)
The wind direction (Inverted) is supplied as a 4 bit value. It doesn’t require inverting, but still needs it’s endianness swapped. It can then be interpreted like section “B” above.
In the example image above, the Wind direction is read as 1100 and it’s endianness is swapped to 0011, which is ENE, or 67.5 degrees.
F – Wind Speed (Inverted)
The wind speed (Inverted) is a 12 bit value. It doesn’t require inverting, but still needs it’s endianness swapped. It can then be interpreted like section “C” above.
From the example image above, the wind speed is read as 000101010000 and it’s endianness is swapped to 000010101000, which is 168, or 16.8 metres per second.
Suggestions
The checksum calculation is very simple and could easily be prone to errors where noise in the line results in invalid data which still matches the checksum.
As both the wind direction and the wind speed are sent twice, I suggest the following checks before a result is considered to be read correctly:
- Check that the start frame is 00100 (0x04)
- Check received checksum matches calculated checksum
- Check that Wind Direction matches Wind Direction (Inverted)
- Check that Wind Speed matches Wind Speed (Inverted)

